

What I like to do with projects like these is to draw them full scale and hang it somewhere I can see it constantly. It helps me to visualise each piece and work out in my head how to make it. Also the periodic bursts of sniggering really worries the hell out of my neighbors. In this case I found a decent fullbody image of the fatboy and then scaled it up and drew it out on paper(I use lining paper from a local DIY place, costs a pittance).

Now find some gas bottles: here I've used a couple of 13kg, a single 19kg and a couple of the big 47kg bottles. The small ones are for the head, the midsize is for his feet and the large ones are for the body. The dark rectangle leaning against the wall behind the bottles is a sheet of 4mm plate I scrounged from a local scrapyard.

All I did was 'top n tail' one large bottle and then halve it, then from the other large bottle chop out two darts to bring my halves up to the right diameters. I'm not giving measurements cause Tbh I can't be Ar$£d. A bit of basic math taking measurements from your scale drawing and you'll soon have them.

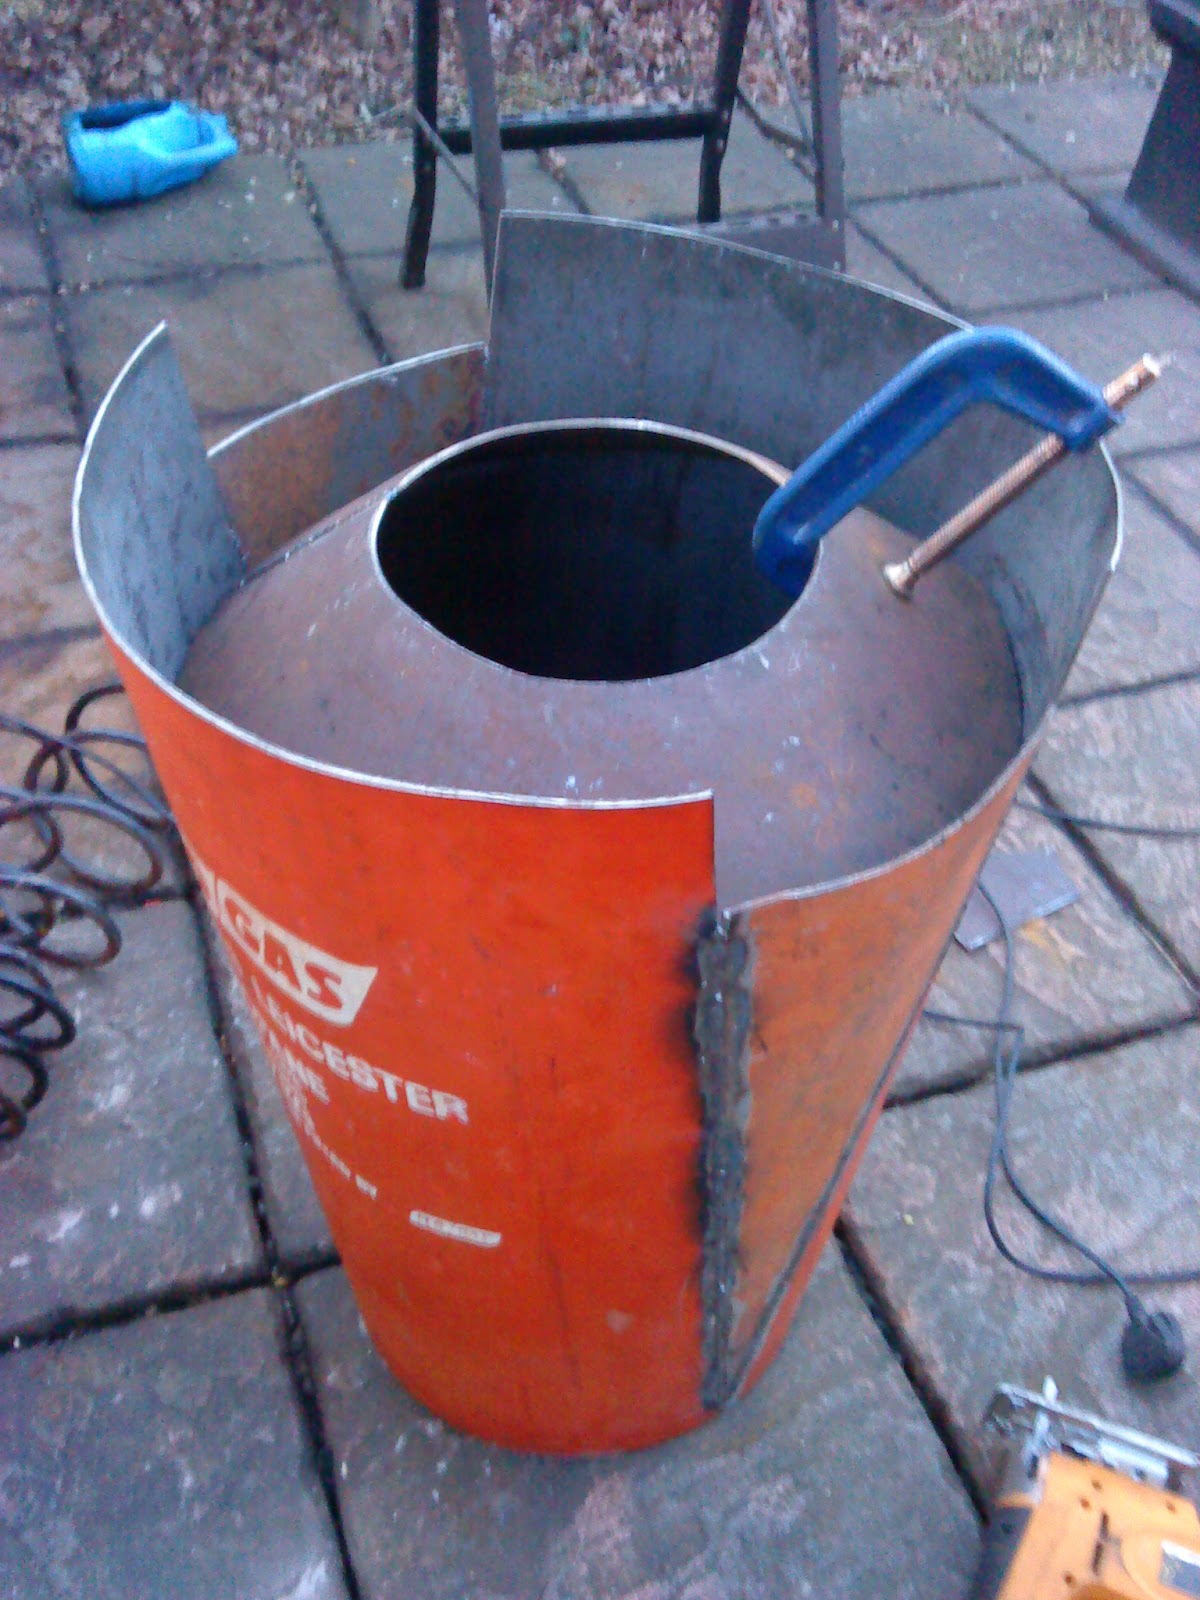
First you'll have to get the right curvature for each piece, that's what the dirty great anvil and big hammer on top of it were used for. Seam weld em together when your happy with the fit, Seam weld from BOTH sides, this is the body tub, it takes a crapload of heat. Really burn the welds in, if your not happy with the weld, grind it out and redo it. It'll save hassle later.

For the collar shoulder piece chop out two half rings, you'll end up cutting them shorter to fit but the excess helps make the next stage easier.


Here I used the same dirty great hammer and a 25lb wieght to hammer against, as you can see it makes a slight mess of the patio, ah well. By overlapping the pieces when hammering you can get a much more even curvature ... ... ...
... Till you end up with something resembling this. Chop off one overlap and weld up, then drop the remainder into the bodytub to get the fit right ... ...
... And you should start to see it take shape.

Mark out and chop/weld the second overlap and then burn in.
Cut off the excess top edges of the body tub and burn in. You can just about see in the photo I've also sorted out the bottom edge and stitched in a floor about 6 or 7cm from the base. Don't weld the floor in at the very bottom of the body tub, you'll see the method in the madness later, hehe.

Now onto the head, you'll need both of your 13kg bottles for this. Firstly chop your first bottle just before it turns into the bottom curve, you then need to weld on a ring from the second bottle to bring it up to length. Take note, the bottom 'jaw' is a lower diameter then the head itself, just chop out enough to make it noticeable but not too much of an overbite. The rest is fairly self explanatory from the pic.

 The eyes are easy enough, using a dishing log (basically a hardwood log with a small cirular depression cut into the top and a round faced hammer - I use a previously modified 3lb lump hammer and a ballpein hammer). You'll probably need a bit of practice to get it right, it won't come automatically - oh yeah, wear gloves the shock through your fingers can be nasty. Just start with a couple of rectangular pieces and then trim to fit inside the visor once welded up.

Now weld in the eyepieces all around. You'll need the dishing log to make a top hat for him now, just start with a circle a little bigger than what you require and then starting from the outside go round and round in decreasing circles. Repeat as needed and then smooth, smaller lighter and concentrated blows. Make a simple tube and then weld on a ball (I found a towball from a car is exactly the right size).

Grind off the paint and hey presto. For the more eagle eyed amongst you, I've added a cigar/stogie. It is actually hollow and by welding a nut inside it you can make it a rudimentary valve for smoke to come out of. The head is entirely hollow and if your welds are good enough they'll be smoke proof.

At this stage you can get a good idea of what he's gonna look like when completed, it'll give you a good laugh at least ... ...

At least you must've laughed now? Jeez some people. OK, back to something a little more ... ... er, serious? Who am I kidding, I'm showing you how to build a 5 n a half foot robot woodstove ... ... I was laughing to myself nearly constantly at this stage, I'm amazed my nieghbours didn't get me locked up :S

Ok, now the legs. For the feet you need the top and bottom of the 19kg bottle. The legs themselves are simply pieces of box that have had darts cut from the back to make them curve.
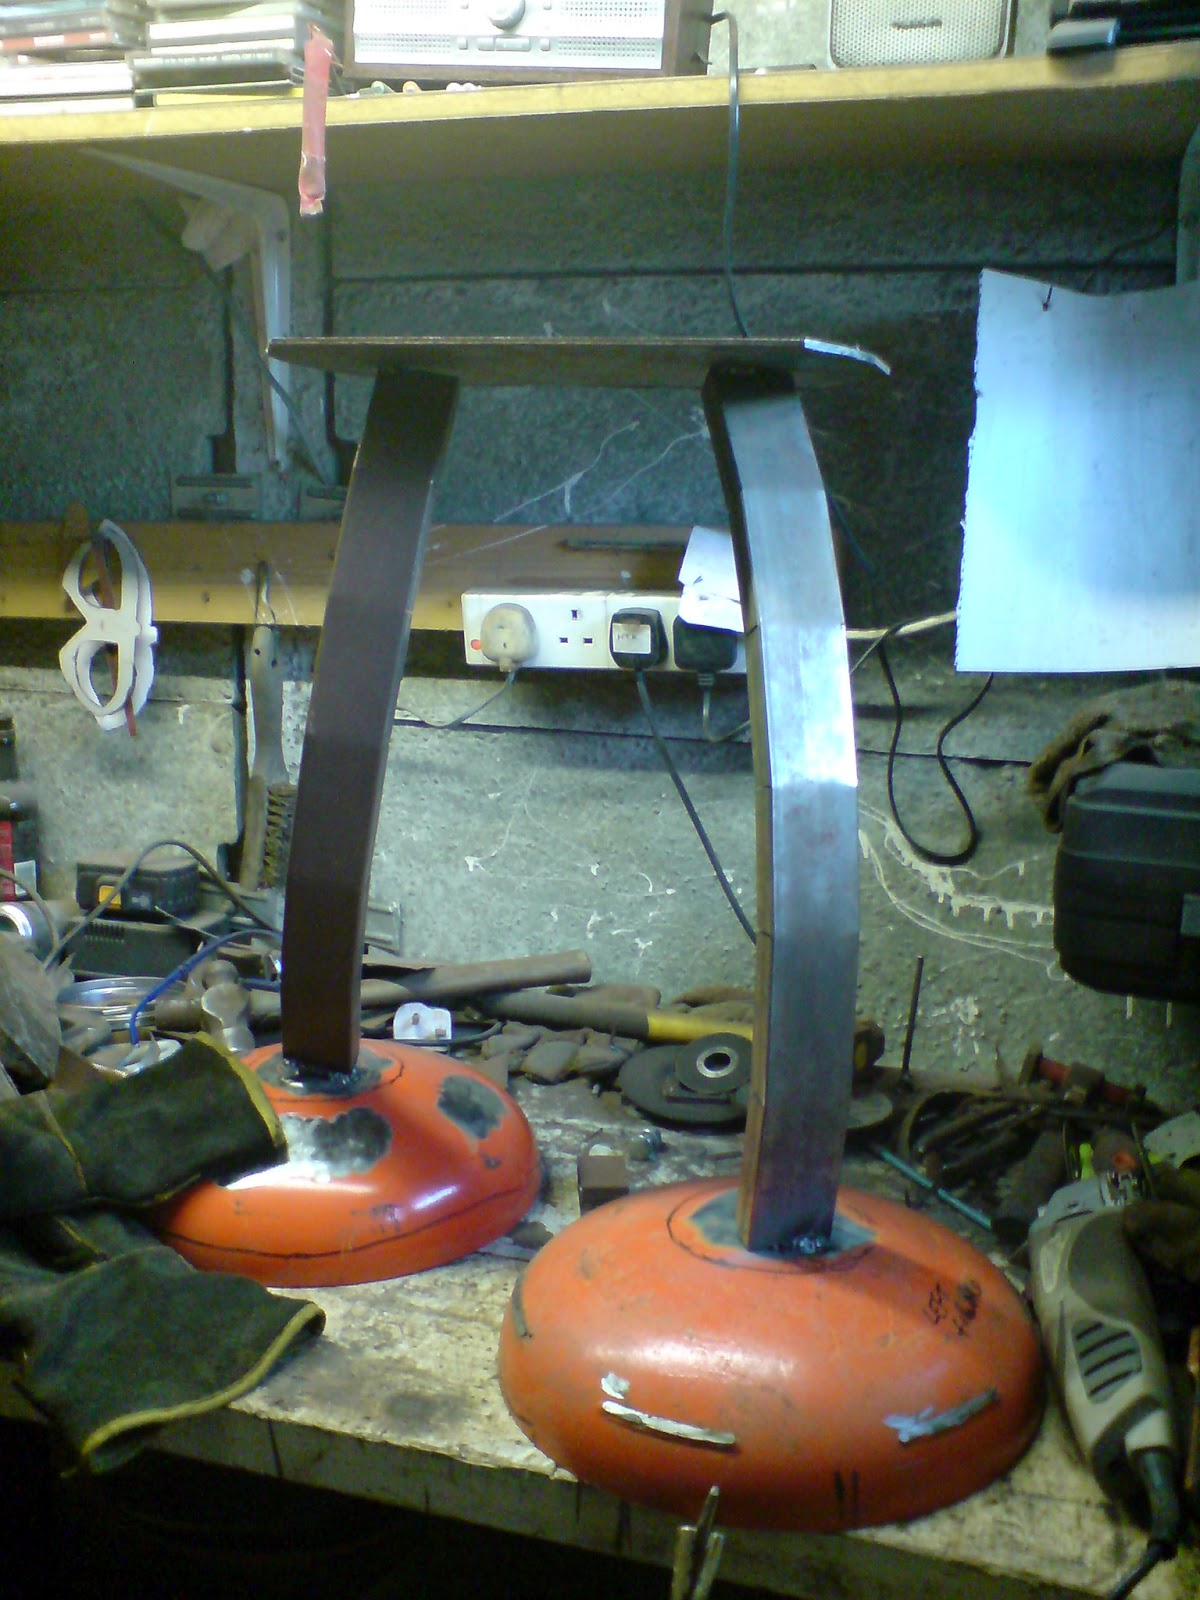
When you're happy with the pose then weld up. Because in this instance I used rectangular box I doubled them up for strength. The plate on top is to attach legs to the body tub.

Clean off the paint and then you're ready for the really fiddly/tedious bit. I've used strips of scrap welded onto the flat sides to act as spacers for the leg bands. The beauty of using thin sheet is that you can bend them reasonably easily to make the pieces sit where you need.

Make up a tube of the proper diameter (from Sketch), weld, clean, blah blah blah. Add more spacers, Note - run them the opposite way, it's much more stable.

To get the leg bands to blend as they go, whatever angle you chop off the top edge of the lower band, take the same amount off the bottom edge of the upper band.I know it's clear as mud but just try it, it'll soon make sense. If you make an angled cut from a cylinder the cut edge has a larger diameter than the original cylinder ...

To get these two bands to line up you need to cut them at the blue lines.

Cut, weld, swear, throw away 'cock ups', give up, come back and try again. Till you get to the top, and then do the other leg. Chop the inner leg support so it's flat and level and weld on a rectangular plate. Make sure the plate fits into the base of the body tub and pre drill clearance holes for the bolts (M12 should suffice).

Weld in the final leg bands, grind down the welds n clean ... ....

... .... and you get a rather nice pair of legs.

And attach to the body, please tell me you at least laughed now? No? Erm, go check your pulse, I think you might have died of boredom :P
Just weld four short bolts onto the bodytub base so that they go through the pre-drilled holes on the leg plate. Because the bodytub base was inset it hides all the bolt threads and nuts.

Okay, now for grabby n squeezy :) (That's his hands for non futurama nerds). If you take the dimensions from the fullsize drawing, and then do a bit of basic math (was that a scream I heard??) you can work out the dimensions for the hand. Again, if your not sure then make a pattern from card to see if it works.

Chop out an end plate to suit then weld em up ... ... ...

Clean up and mount onto the end of the arms. You can just about see from the photo that the disc is welded from both inside and out, because you clean up the outer weld you can lose integrity if it's only welded from the outside.

The fingers themselves are merely tube and another example of 'lazy man bending'. Weld up n clean, cut a small disc to finish the end of the finger and now decide how you want to mount the fingers ... ... ...

For 'grabby' l decided to just let the fingers fall into a natural curl ... ... ...

... ... and 'squeezy' l made so it would hold a beer bottle (sorry about the blurred photo - a combination of massive amounts of caffiene and a crappy camera).

As can be seen here, and at least he has decent taste in beer (although technically that isn't beer, it's brake fluid. l was bleeding some brakes and didn't have a milk bottle to hand - meh)

More lazy man style bending to position the arms. Play around till you get them how you want then ... ...

Then brace up. Here you can see how the arm attaches to the body.

Band up the arm till you get near the top. There's no need to go completely all the way back to the body tub, the shoulder piece will cover a small gap. So onto the shoulder ... ..

Again using the dishing log make two shoulder bowls, make them too large as you need to cut them back to fit the curvature of the bodytub. The next bit is a real 'Faff', did l hear a groan? As well as fitting it to the body you also need to cut a clearance hole for the arm ... ... ... enjoy :P

The two main probs are that you are fitting a curved panel to a curved body, also you are trying to cut a clearance hole thru said panel for an angled cylinder. Just be prepared to make a few replacements when you mess it up, I now have four 'previous versions' lurking around under the bench in shame ... ... meh :P You won't get it perfect, so don't beat yourself up.

When you decide to grind off the paint, and you will need to grind it off using a grinding disc (you've got a really thick layer of paint and a thick layer of primer which both need to come off), use a mask or in an open area. I managed to poison myself and make myself sick for a few days because of the dust. Grind first, then flat with a flap wheel, and the the fatboy really starts to look pretty good. Don't try to get it perfect as you'll either thin the welds too much from grinding or really really show up any imperfections.

Okay, now for the rope seal on the door. Find yourself some small channel (the stuff I use is around 10mm)or make it, worst case scenario. The stuff l can readily get my hands on is too deep, so I have to slice it down a little ... ....

Just slice it down a little then grind it to make it more even

In order to get the curvature just clamp the end to the bodytub and bend it round with your hands ... ...

... ... now cut some strips off another donor bottle to act as support strips for your channel and weld them on, tack em first just to make sure they fit, then seam weld em in.

Now comes a painful bit, you have to drill holes (around 8mm) in the bodytub to act as a kind of spot weld. Make sure you grind the flashing off the inside of the tub, else you won't get the strips to sit flat ... ...

... ... then burn the spots in .. and repeat till you get to the hinge side ... ..


... Drill n spot the hinges on ...
... ... With your last piece of channel positioned in place measure and cut pieces of body steel to sit around your hinges (you can see here I've had to chop back the hinges to sit inside the rope sealed ledge, no hassles) ... ...

... so this is what you should end up with ...

... Now burn in the welds and then piggy back pieces of bodytub behind the hinge rebates ... ...

.. ... and now drill n spot the rope seal edge piece into position ... ...

.... then drill n spot the door into position, try to make sure you get the clearance edge around the whole door, if you don't then no worries, you've got an angle grinder ...

Okay, now the door latch. Here I've used a couple of M12 bolts (the unthreaded part is handy - just looks neater). For the door disc just drill n spot it to the end of the bolt, cut a small length of tube and then ... ... ...


Now cut the chimney/shoulder piece. it's pretty much the same as blending arm/leg bands but using thicker pieces. For the chimney DO NOT USE LESS THAN 5 INCH. it doesn't work. Any less you can't get the draw and because you're burning wood the creosote will fur up the chimney without decent draw.

Position and chop out a hole suitable for the chimney piece on the shoulder.

Really really burn the welds in, they take alot of stress. For how to construct the butterfly valve refer to my 'gas bottle stove instructional', and yes I'm too lazy to repeat the steps here.The same applies for the grate ofc :P

Okay, now for the bottom vent. Here I've used another (oh what a surprise) small gas bottle. Drill a clearance hole through all three pieces for whatever bar/rod you want to use .. ...

... now chop clearance holes through the base plate (I used a plasma cutter, so much easier). make sure the bar turns freely then weld in. Make sure the ports are clear of the leg/base plate - it would be gutting (to say the least) if they interfere.

Now cut three slightly elongated discs, these are going to be the butterfly valves, shape them to fit, get them all the same as far as possible ... ...

... .... tack weld em in place first in case you need to make adjustments, if your fairly happy and the bar turns then burn in. Weld a tab onto the end of the bar for a handle and you're done.

The eyes and mouth are easy enough to do, just find an expression you like and then using enamel paint (it'll last a little longer under the extremes of heat). I've painted the the eyes heavy lidded and glancing off to one side, it gives him a slightly furtive evil look that I quite like - almost as if he's planning something nefarious.
Okay, that's it, you're pretty much done. Just plumb him in, fire him up, crack a beer and then just snigger gently to yourself for at least the next month. Oh, and let me know if you make one yourself, I would love to see photos. To paraphrase Douglas Adams 'Keep banging the rocks together guys' or in our case bits of metal. Laters Y'all.